Embroidery Stitch Guide
- Backstitch
- Blanket Stitch
- Brick Stitch
- Bullion Couching
- Bullion Stitch
- Chain Stitch
- Colonial Knots
- Couching
- Detached Chain Stitch (Lazy Daisy)
- Drawstring Stitch
- Free Straight Stitch
- French Knots
- Lined Long and Short Stitch
- Long and Short Stitch
- Outline Stitch
- Padded Satin Stitch
- Reverse Chain Stitch
- Reverse Stem Stitch
- Running Stitch
- Satin Couching
- Satin Stitch
- Seed Stitch
- Split Stitch
- Star Stitch
- Stem Stitch
- Straight Stitch
- Turkey Work
- Woven Basket Stitch (Diagonal)
Backstitch
Backstitching creates smooth, solid lines and is popular for outlines and text. Bring your needle up through A, down through B, up through C and down through B again. Repeat, moving up through D and down through C. Continue this pattern along your line, trying to keep the stitches uniform in length. Shorten your stitches around curves to make cleaner, more accurate lines.

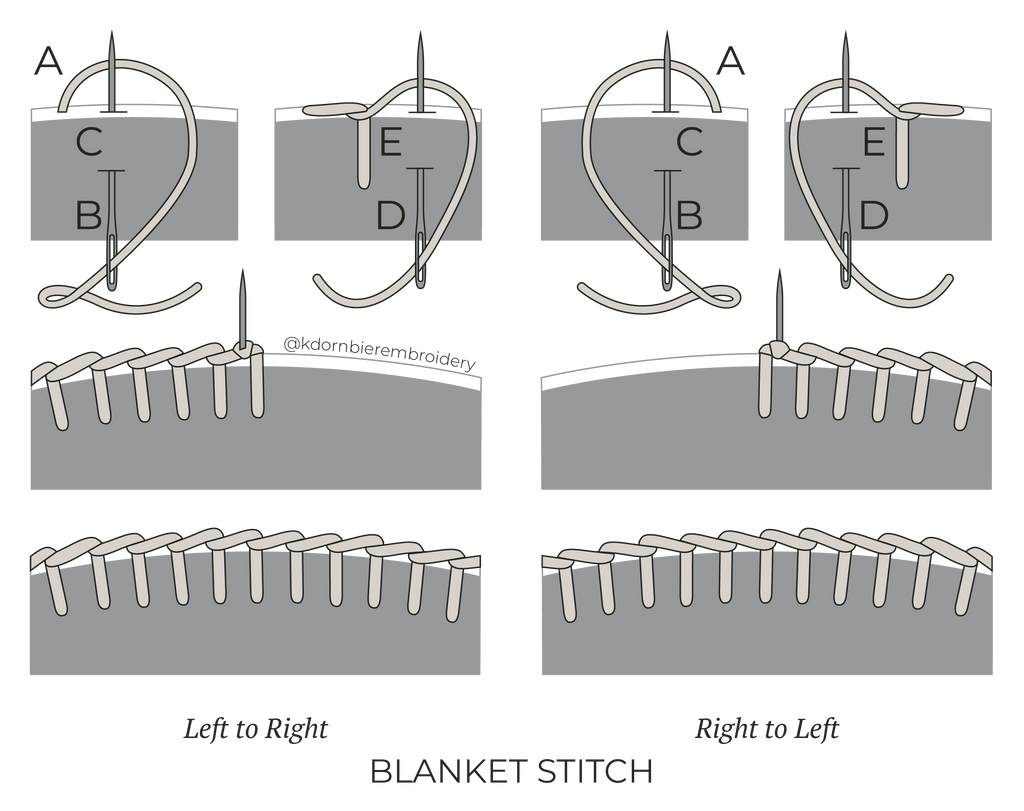
Blanket Stitch
The blanket stitch is used for attaching the felt backing piece to your hoop. Thread your needle and knot the tail end. Begin by bringing the needle up at A through the gathered fabric, close to the hoop. Bring the needle down through the felt circle at B, about 1/4” from the circle edge. The needle will come up through the hoop fabric at C, about 1/4” to the right of point A. Keep the working thread under the needle. When you pull the thread through, it will form an angle that follows the top of the felt circle. Continue the stitch around the entire hoop.
If you run out of thread during a blanket stitch, end the first thread at the ‘top’ of a stitch by anchoring the working thread with a small straight stitch. Bring your new thread up through the anchored corner and continue with the blanket stitch.
Brick Stitch
The brick stitch uses the backstitch to fill in an area with a brick-like pattern. Make a straight row of backstitches across the top line of the shape to fill (A). When you’ve finished the first row of backstitches, you’ll make a second, offset row using the same technique (B). Start the second row with a half stitch that finishes in the middle of the stitch above, and continue down the row with offset stitches. Fill in the remainder of the shape by alternating between regular rows and ‘offset’ rows.

Bullion Couching
Bullion couching uses the couching technique to give a slight curve to the bullion stitch, which normally lays in a straight line.
Bring the needle up through A, at one end of where the stitch will lie. Bring the needle down at B where the stitch will end. Create a bullion stitch that is slightly longer than the distance between A and B to allow for shaping. When the bullion knot is ready, you will pin the coil in the desired shape using one or more small straight stitches. For this example: bring the needle up at C, over the bullion stitch, and down at D, pulling the bottom of the coil toward the desired shape. Bring the needle up at E and down at F. Add more couching stitches if necessary until the knot is in the desired shape.
If the bullion stitch is simply not cooperating, satin couching creates a similar effect.

Bullion Stitch
Also referred to as the caterpillar stitch, the bullion stitch is worked similarly to a French knot to create a short, coiled bar. Like the French knot, the bullion stitch requires a little bit of practice to get right.
Bring the needle up through A, at one end of where the stitch will lie. Bring the needle down at B, at the desired length of the coil, but don’t pull the needle completely through. Instead, bring the needle partially out again through A. From here, wind the thread around the needle multiple times. The distance of the wound thread should roughly measure the same as the distance between A and B. Like the French knot, hold the wrapped thread taught with one hand and pull the needle out with the other. Keep pulling the needle until the wraps are tight and the stitch lies flat against the fabric. Adjust and straighten the wraps if required and put in the needle back through B.
If the bullion stitch is simply not cooperating, satin couching creates a similar effect.

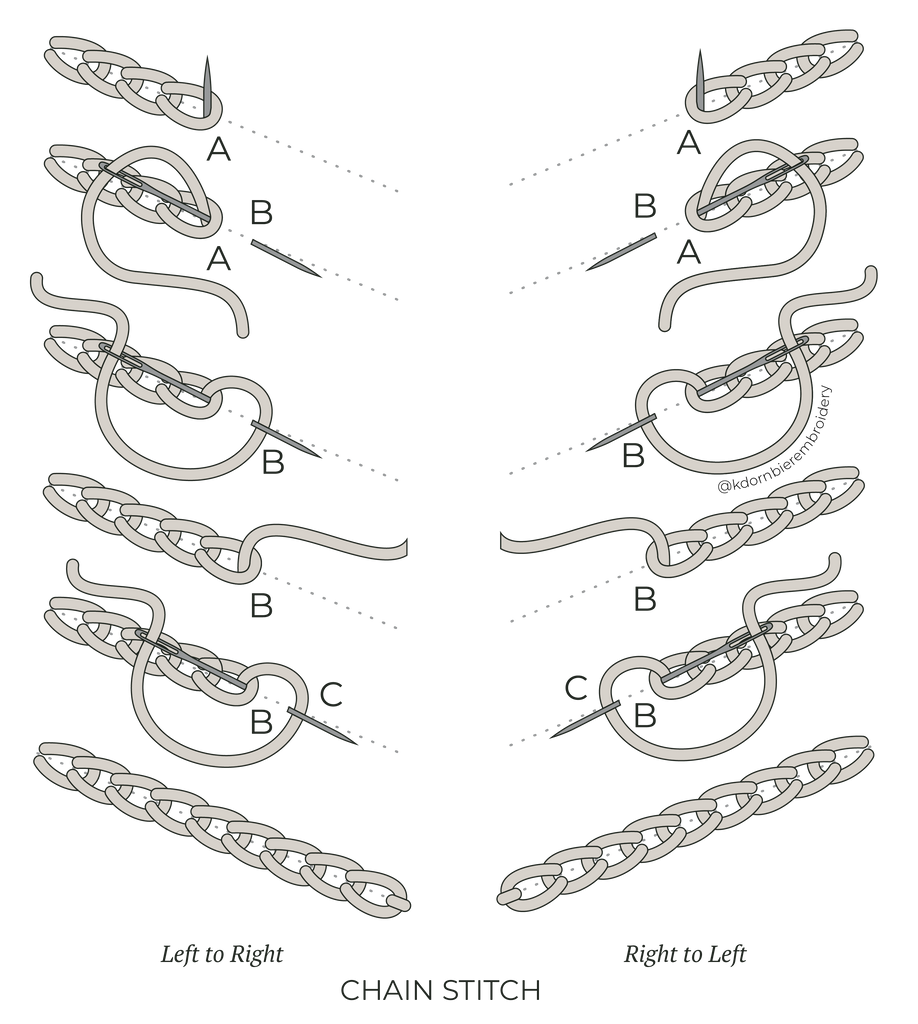
Chain Stitch
The chain stitch creates a distinct, textured line that resembles little chain links. It is one of the oldest embroidery techniques, and is very popular for lettering. The reverse chain stitch creates an almost identical look, but is much easier to work.
Bring the needle all the way up at A. Put the needle back in at A and out through B, but do not pull the needle out completely. Wrap the thread under the needle to form a loop. Pull the needle out to finish the first chain. Put the needle back in at B (inside the first loop) and out at C. Wrap the thread under the needle as before. Bring the needle out again and continue working the stitch down the line. Finish the last chain with a small straight stitch.
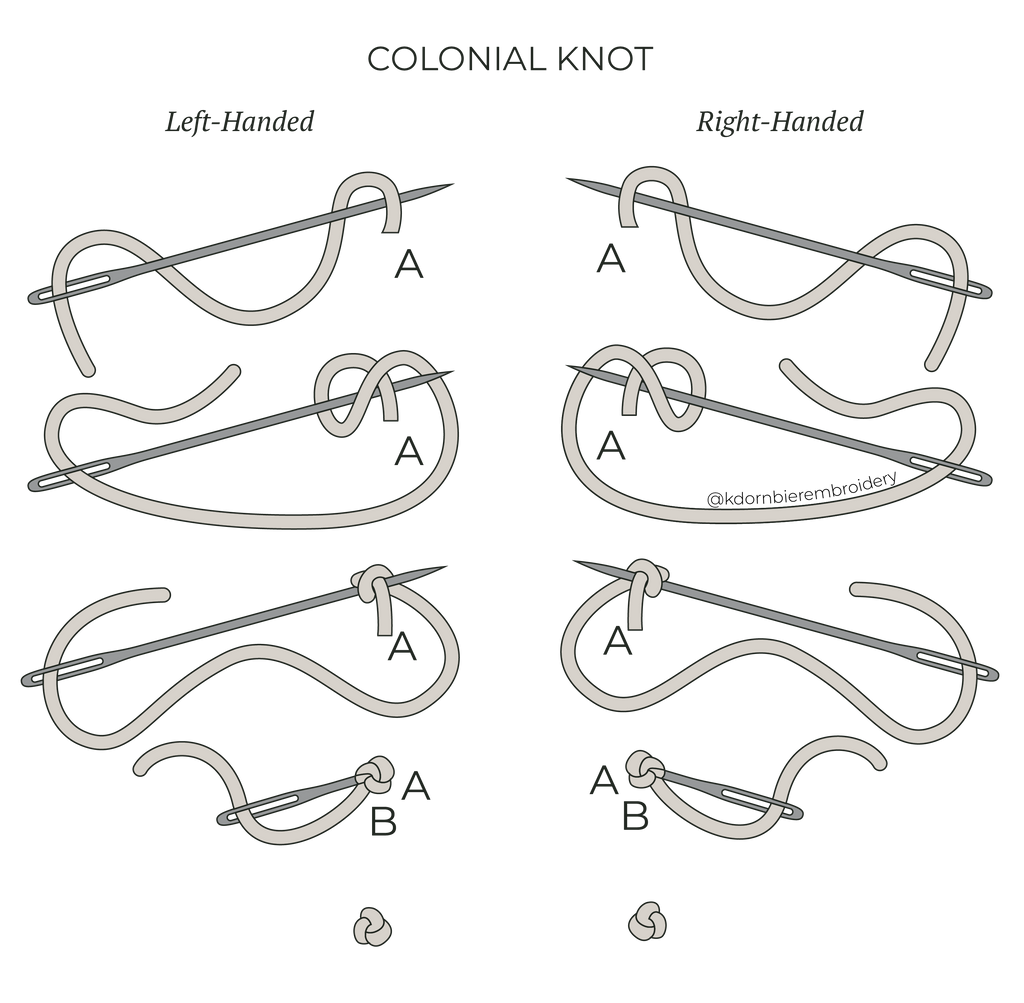
Colonial Knots
Colonial knots are an alternative to French knots, as they are slightly easier to produce. Bring your needle up at A where the knot should be placed. Make a backwards ‘C’ with your floss, and place your needle through the center. Wrap the floss up and over the needle tip, making a Figure 8. Pull the floss taut and keep tension while you insert your needle down at B, right next to the original hole. To make a bigger colonial knot, use more strands of thread.
Couching
Couching is the process of ‘pinning’ a length of thread in place using small stitches. The stitch can be worked with threads of different sizes, colors, and types for varying effects. Couching is easy and versatile, making it popular for outlining shapes and letters.
Bring the needle up at the beginning of your line, A and down at the end of your line, B. If the line you are working is curved, leave enough slack in the thread for it to follow the desired shape. This is called the ‘laid’ thread. Next, come up at C, over the laid thread, and down through D. This is the first couching stitch, tacking the laid thread along the line. Continue making evenly spaced couching stitches until the laid thread is in the correct shape.

Detached Chain Stitch (Lazy Daisy)
DThe detached chain stitch, also called the lazy daisy stitch or link, is the process of making one single chain on the fabric. As the name suggests, it’s a common beginner stitch for making daisies, but it has many, many uses.
Bring the needle up from the back of your fabric at A, and back down through the same hole. Don’t pull the thread completely through; instead, leave a small loop. Bring your needle up through the fabric at B, and guide the needle through the loop. Pull the thread through gently to create the link. Bring your needle down at C, on the other side of the thread, to secure it in place.

Drawstring Stitch
For the drawstring stitch, you’ll begin your stitching from the front of your fabric. Bring your thread down at A, leaving a generous tail. Come up at B and down at C, Making a small locking stitch over the loose tail. Come up at D, to either side of the locking stitch or splitting it. Tie a knot in either tail at your desired ‘drawstring’ length, and trim the thread beyond the knot. The two tails will hang loose in the finished product.

Free Straight Stitch
A free straight stitch is a quick way to add a small 3D element to your embroidery. Bring your needle up at A and down at B, leaving some slack between the two. Bring the needle up at C and down at D, making a very small locking stitch across the thread. Be careful not to pull your slack through. Secure the other end of your thread by coming up at E and down at F, again making a very small locking stitch. Working carefully around this loose loop to avoid snagging it in your other stitches.

French Knots
French knots are most commonly used for decorative dots or filling sections with texture, like flower centers, sweaters, or curly hair. They are tricky to get the hang of, but very satisfying when done correctly. Practice several before starting in on the design.
Bring your needle up through the fabric at A, where the knot should be placed. Pull the thread all the way through. Hold the needle in your dominant and wrap the thread around the needle once or more (depending on how big you want the knot to be). Hold the loops taut against the needle and push the needle back through the fabric at B, right next to the original hole. Slowly pull the needle and thread through to finish the knot, keeping tension on the thread until the knot is finished.
To make bigger French knots, wrap the thread more times, or use more strands of thread. If French knots cause you too much of a headache, you may find colonial knots easier.

Lined Long and Short Stitch
With the lined long and short stitch, the lined edge(s) are ever-so-slightly lifted off of the design to give definition to the section or shape. Start by working along any the indicated edge(s) with a split stitch (A). If there is a lined edge at the beginning of your long-and-short stitch section (B), bring your thread up on the outside of the split stitch and cover it with your long-and-short stitches. Continue your long and short stitches like normal. If there is a lined edge at the end of your long-and-short stitch section ( C ), land your final row of stitches on the outside of the split stitch to completely cover it.

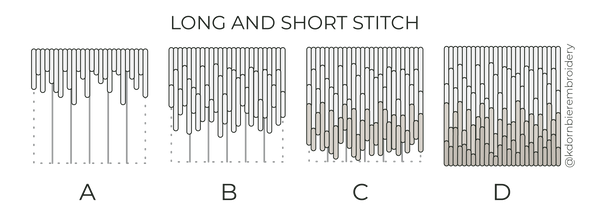
Long and Short Stitch
Long and short stitching, sometimes referred to as needle painting or silk shading, is a fantastic technique for filling in areas of fabric. A section can be filled in with a single color, or multiple colors can be blended together to give a beautiful, realistic ‘painted’ effect.
If stitch direction guidelines are provided, you may find it helpful to lightly draw the stitch directions onto your fabric with a pencil or Frixion pen; they will be completely hidden in the final piece.
Row 1 (A) is filled in with varying lengths of straight stitches packed tightly together. With this first row, bring your needle up at the shape’s edge and down into the shape, following the stitch direction. For Row 2 (B), bring the needle up through the previous row (splitting the stitches, if possible) and down into the empty area. If you attempt to come up in the empty area and down through the filled section, you will end up with tiny holes. Continue using random stitch lengths, and add extra stitches wherever necessary to cover empty spaces.
To make a color transition (C), work one or more rows with your second color then one or more rows with your third color, and so forth. Each color will overlap with its neighbors, creating the blended effect.
For the final row (D), you will end your stitches at the edge of your shape.
Outline Stitch
The stem stitch is often referred to interchangeably with the outline stitch. They are almost identical and, in most cases, either will work, but there is a distinct difference. When working from left to right, the needle is brought up just below your line and brought down just above your line. Visually, the difference is teensy but still noticeable, and is caused by the direction that the floss thread is wound.
Working from left to right, bring the needle up just below your line at A, and down just above your line at B. Bring the needle up at C, slightly below the line again and at the midpoint of the first stitch. Come down again at D, slightly above the line. Continue in this way along the line. Shorten your stitches around curves for smoother, more exact lines.
A thinner line can be achieved by working the stitch directly on your line (instead of slightly above and below the line). Working from left to right again, Bring the needle up at A and down at B, but do not pull our thread taut. Bring the needle up at C, halfway between A and B. Keep the loop of the previous stitch above the needle and gently pull the thread taut. Come down at D and continue along your line.
When working from right to left, the process is flipped upside-down (bring your needle up slightly below your line and down slightly above it).
How do you know when to use the stem stitch and when to use the outline stitch? In most cases, it won't matter. If you’re working along a curve, it’s safe to assume your needle should come up at the inside of the curve and down at the outside of the curve.

Padded Satin Stitch
A padded satin stitch gives your stitching a nice, slightly raised effect, and makes any gaps in the satin stitch less noticeable. Start by outlining the area with a split stitch. Loosely fill in the area with seed stitches or running stitches that are perpendicular to the satin stitch direction. Finally, complete the satin stitch like normal, covering the split stitch outline and filler stitches.

Reverse Chain Stitch
The reverse chain stitch is almost identical to the classic chain stitch, but is much easier (especially for very small chain stitching). Begin with a small straight stitch. Bring your needle up at A, then slide it under the straight stitch, without going through the fabric. Bring the needle back down at A. Bring the needle up at B, slide it under the previous stitch, and go back down through B. Continue this stitch along your line.

Reverse Stem Stitch
The reverse stem stitch creates the look of the stem stitch, but is worked similarly to the backstitch.
Bring your needle up through A and down through B. Bring your needle up through C, and come down through D, which is slightly above your first stitch and at the midpoint of A and B. Continue this pattern along your line, trying to keep the stitches uniform in length. Shorten your stitches around curves to make cleaner, more accurate lines.

Running Stitch
Running stitches are great for outlining, filling, and decorative trim. A running stitch is a row of spaced-out straight stitches resembling a dotted line. Bring the thread up at A and down at B, then up at C and down at D. Continue this way along your line.Typically, each stitch is the same length and the spaces between the stitches are the same length. Play around with different lengths for varying effects.

Satin Couching
Satin couching is worked the same as regular couching, but with couching stitches very close together. The end result looks like a very thin, padded satin stitch. Bring the needle up at the beginning of your line, A and down at the end of your line, B. If the line you are working is curved, leave enough slack in the thread for it to follow the desired shape. Next, come up at C, over the laid thread, and down through D. Continue down the laid thread, making couching stitches very close together (but not overlapping).

Satin Stitch
Satin stitches are just straight stitches made very close together to fill in an area. Starting at the center of a shape, bring your needle up at A, down through B, up again at C and back down through D. Try to stitch as close as possible without overlapping. Fill one side of the shape first, then return to the center and fill the other side (this prevents slanting).The satin stitch direction guidelines are also provided to help keep your stitches in line.
It will be tempting to use more than one or two strands to fill in a section faster, but doing so may lead to lumpy, noticeably uneven sections.

Seed Stitch
Seed stitches are used for filling spaces or for adding texture. Scatter straight stitches randomly, at different angles, or even in groups.

Split Stitch
The split stitch is useful for outlining, and is a good alternative to the backstitch. Bring the needle up at A and down at B. Bring the needle back up at C, right through the center of the previous stitch to ‘split’ the thread. Take the needle down at D. Continue working along your line, coming back up through the previous stitch. To make the smoothest lines, shorten your stitches around curves.

Star Stitch
For the star stitch, work on each star ‘arm’ individually. Start by coming up at corner A and down at B, just to the right of the point. Come up at C, just to the left of the point, and down at the opposite corner, D. Repeat, moving slightly inwards; bring the needle up at E, down at F, up at G, and down at H.
You’ll continue this process, slowly working down the slopes and towards the center of the star. Work all the way down one arm before moving on to the next, until the star is filled.
The process is the same for a six-point star.

Stem Stitch
The stem stitch creates a smooth, wrapped line that is commonly used for outlining and cursive lettering. As a beginner, you may find it easier to work the reverse stem stitch.
Working from left to right, bring the needle up just above your line at A, and down just below your line at B. Bring the needle up at C, slightly above the line again and at the midpoint of the first stitch. Come down again at D, slightly below the line. Continue in this way along the line. Shorten your stitches around curves for smoother, more exact lines.
A thinner line can be achieved by working the stitch directly on your line (instead of slightly above and below the line). Working from left to right again, Bring the needle up at A and down at B, but do not pull our thread taut. Bring the needle up at C, halfway between A and B. Keep the loop of the previous stitch below the needle and gently pull the thread taut. Come down at D and continue along your line.
When working from right to left, the process is flipped upside-down (bring your needle up slightly below your line and down slightly above it).

Straight Stitch
The straight stitch is the simplest embroidery stitch; it is making one single stitch. Bring the needle up through the fabric at A, where the stitch will start, and back down at B, where the stitch will end. Straight stitches can be any length and lay in any direction.

Turkey Work
Also called a ‘fringe stitch’, turkey work is a great way to add texture and dimension to your embroidery. It is a slightly more difficult stitch (and uses a massive amount of thread), but the end results are worth it. For a fuller fringe, use more strands of floss.
For this stitch, there is no need to tie a knot at the end of your thread. Starting from the front of your fabric, bring the needle down at A, and leave a small tail of thread on the top of your work. Come up at B and down at C, making a very small stitch over the tail. This is called a locking or tacking stitch.
Come up at D, splitting the first locking stitch, and come down at E. Do not pull the thread all the way through; instead, leave a small loop. Come up at F and down at G, creating another locking stitch to secure the loop. As you work, it is helpful to hold the finished loops down and out of the way with your non-dominant hand.
Repeat; bring the needle up at H, splitting the previous locking stitch, and come down at I. Leave another small loop, and make a locking stitch from J to K. Continue making a row of locked loops.
Finish a thread with the split stitch step, leaving another loose tail at the front (L). Fill up your shape with rows of these loops (M).
When your shape is filled, you can cut the loops (N) or leave them intact. Cutting the loops and twisting the ends between your fingers makes a cute little fuzzy patch, like the pom pom on a knit hat. Pick up any tiny bits of cut floss with a piece of packaging or masking tape.

Woven Basket Stitch (Diagonal)
The basket stitch makes a wonderful woven texture for use in things like baskets, sweaters, rugs, etc.
Following the pattern, make all of the diagonal straight stitches in one direction. Some stitches near the middle may be quite long. Then, bring the needle up at A. Work the needle under and over the cross stitches (without catching the fabric), and bring the needle back down at B. Bring the needle up at C and work through the cross stitches again, choosing the opposite of the line before to create the woven effect. Come down at D. Continue adding the opposite diagonal stitches, using the endpoints of the first set of diagonal stitches as your guide.
